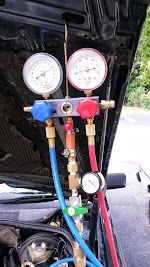
When I first bought my 1985 190E 2.3-16v (back in 2010), the A/C worked. It didn’t work all that well though, and I assumed it was a bit low on refrigerant. It spent a year or so up on blocks while I did a bunch of things to it which should not have taken a year, but after getting it back on the road the A/C no longer worked. Inspection showed that the system was completely empty now (zero pressure at all).
After doing a fair amount of research online I decided to use Envirosafe ES12a Industrial refrigerant in the car. This is a R12 replacement which many folks have had excellent luck with. Also a positive is that it is non-toxic and very cheap. There are many flame wars online concerning the dangers of hydrocarbon based refrigerants but it seems to be a fairly mute argument given that R134a and R12 are also somewhat flammable, and we are driving cars around with over 10 gallons of gasoline onboard (which then gets pressurized in the engine bay). Based on reviewing the information it seems low risk and the benefits are pretty tangible.
I bought some supplies for the project:
- Harbor freight A/C manifold (already had) – Very similar to this one.
- High side R134a adapter fitting – The 190E came with R12 fittings. It needed a somewhat uncommon 7/16″ thread fitting (most are 3/8″). I bought the “A/C Pro” VA-LH11 which includes a full set of fittings of which I used only one.
- Low side R134a right angle adapter fitting – Note that these fittings require the schraeder valve to be removed on the r12 fitting they are bolting onto. Also since they use a rubber sealing washer underneath they are not supposed to be tightened too much. Just over hand tight was recommended! Mine was from ebay but they are available all over.
- A/C vacuum pump from Autozone – A refundable cost of around $180
- R134a cap tap adapter from Autozone as well – Also made by A/C Pro.
- Three cans of Envirosafe ES12a from autorefrigerants.com
- Replacement receiver/dryer – Purchased from amazon for around $25.
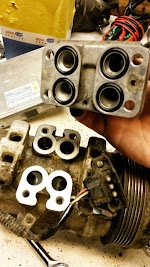
After procuring all these items I replaced the receiver/dryer and then checked the system for leaks with the vacuum pump. It was clear that there was a fairly significant leak. I decided the best way to find it would be to connect my air compressor to the system and pressurize it to ~120psi. After it was pressurized I jacked the car up and sprayed everything in the system with soapy water. I could definitely hear a slight hiss and after a time started hearing bubbling. Some searching around led me to bubbles on the output of the compressor. There is flange on the compressor which the lines connect to which is then bolted to the compressor housing. The interface between this flange and the compressor was leaking badly.
The compressor came off and the flange was removed, revealing four o-rings. Two of them were completely destroyed. They were available online but not locally, but I managed to find some o-rings at Home Depot which were close enough that I felt confident them would work (a #13 O-ring, 7/8″ OD, 3/16″ wide). I dumped the oil out of the compressor and around 10cc’s came out. The service manual suggested that 20cc’s additional oil should be added when the receiver/dryer is changed and if the system has been vented to no pressure. So 30cc’s of oil was added to the compressor directly before I assembled it all together and put it back on the car.
Once the compressor was back on I pumped the system down with the vac pump and then held it at a vacuum. It held overnight so I was confident that there were no more leaks remaining in the system. Although this isn’t a perfect test (since the A/C system operates under pressure not vacuum) it is usually pretty reliable.
Envirosafe says that 6oz of ES12a is equivalent to 18oz of r12. The 190e has a capacity of 35oz of r12, which equates to ~12oz of ES12a (or two cans). Envirosafe says to charge the system into atmospheric pressure and not vacuum, so I vented it down to a light vacuum (6″) before starting the charge. This may have been a mistake but I had read this was OK online. They said that charging into a vacuum could result in an overcharge. Randy at autorefrigerants.com had said that the best way to charge was to have the car running and charge it up to no more than 40psi. Here is where things went a little wrong since I ended up overcharging the system. My 190E has an annoying problem with idling when cold, it just won’t idle stably and usually kills. So I wired the throttle open a bit during this operation and had the car at 1500-2000rpm. What I didn’t realize is that the low side pressure goes down at higher rpm. So when I charged it up to 40psi at 1500rpm it meant that at idle I was at 50psi (too high!). I had only added about 1 and a half cans, so in this case it took less than I expected. I didn’t realize this at first though and drove the car around a bit, finding that the A/C did not blow cold!
From what I have been told it is not a good idea to partially vent the system to reduce the pressure. It has to be vented completely then recharged. I also noticed however that my high side pressures are a bit high (250psi at idle) and the low side pressure is quite variable. I am speculating that my expansion valve might be defective since the system seemed to go flop between cool and warm, so my plan is to change it out before I charge it up again. The part is only 20 or 30 bucks so it is a fairly low investment.
UPDATE (9/15/2013):
I vented the system out, replaced the expansion valve, then recharged and things seem to be working. This time I added only a small amount of refridgerant (the rest of the leftover can). It gets quite cold now as long as the car is moving, but not at idle. I think it needs a bit more refridgerant, but I’ll work my way up to it since I don’t want to overcharge!


